Tonight was Back to School Night at Nana Bear's elementary school. So far this year, I have not been as present as school as I have in past years. Nana has decided that she doesn't want me waiting with her in the mornings and now that Dare Bear is going to pre-school that is nearby the elementary school it is just as easy to just drop her off and then drop him off. But I miss chitchatting with parents or teachers before school and feel a little disconnected.
So, tonight was one of the first opportunities to get a feel for the teacher. So far, he's been great - e-mailing at the end of the first week, over the weekend no less, sending out reminders for picture day, etc. BUT, of the two 2nd grade teachers, he is also the less structured teacher and when it comes to school stuff, I'm all about structure, comforted by structure. Nana, however, has been very happy and extremely excited to be in this class.
He answered a lot of good questions from the parents and in a thoughtful manner. I like his philosophy and more importantly, I think his style suits Nana well and also balances out my tendency to be strict. He raised many good points and this year will be learning experience of both Nana and I, but in a good way.
Wednesday, September 12, 2012
Monday, September 10, 2012
Photo Blocks

I can't remember what inspired this idea, whether it was another craft blog or photo site or if I came up with it on my own, but I've had it in my head to do for at least 3 Christmases now and I'm finally following through. As I posted yesterday, Pick Your Plum ran a deal on sets of 9 - 1.5 inch wooden cubes, which after shipping came to about $6.75 a set. I had half a 16 oz bottle of Mod Podge left over from last year or the year before, finally bought a bone folder, and 21,000+ photos to choose from, so this year seemed as good as any to make some photo blocks.
Tools needed:
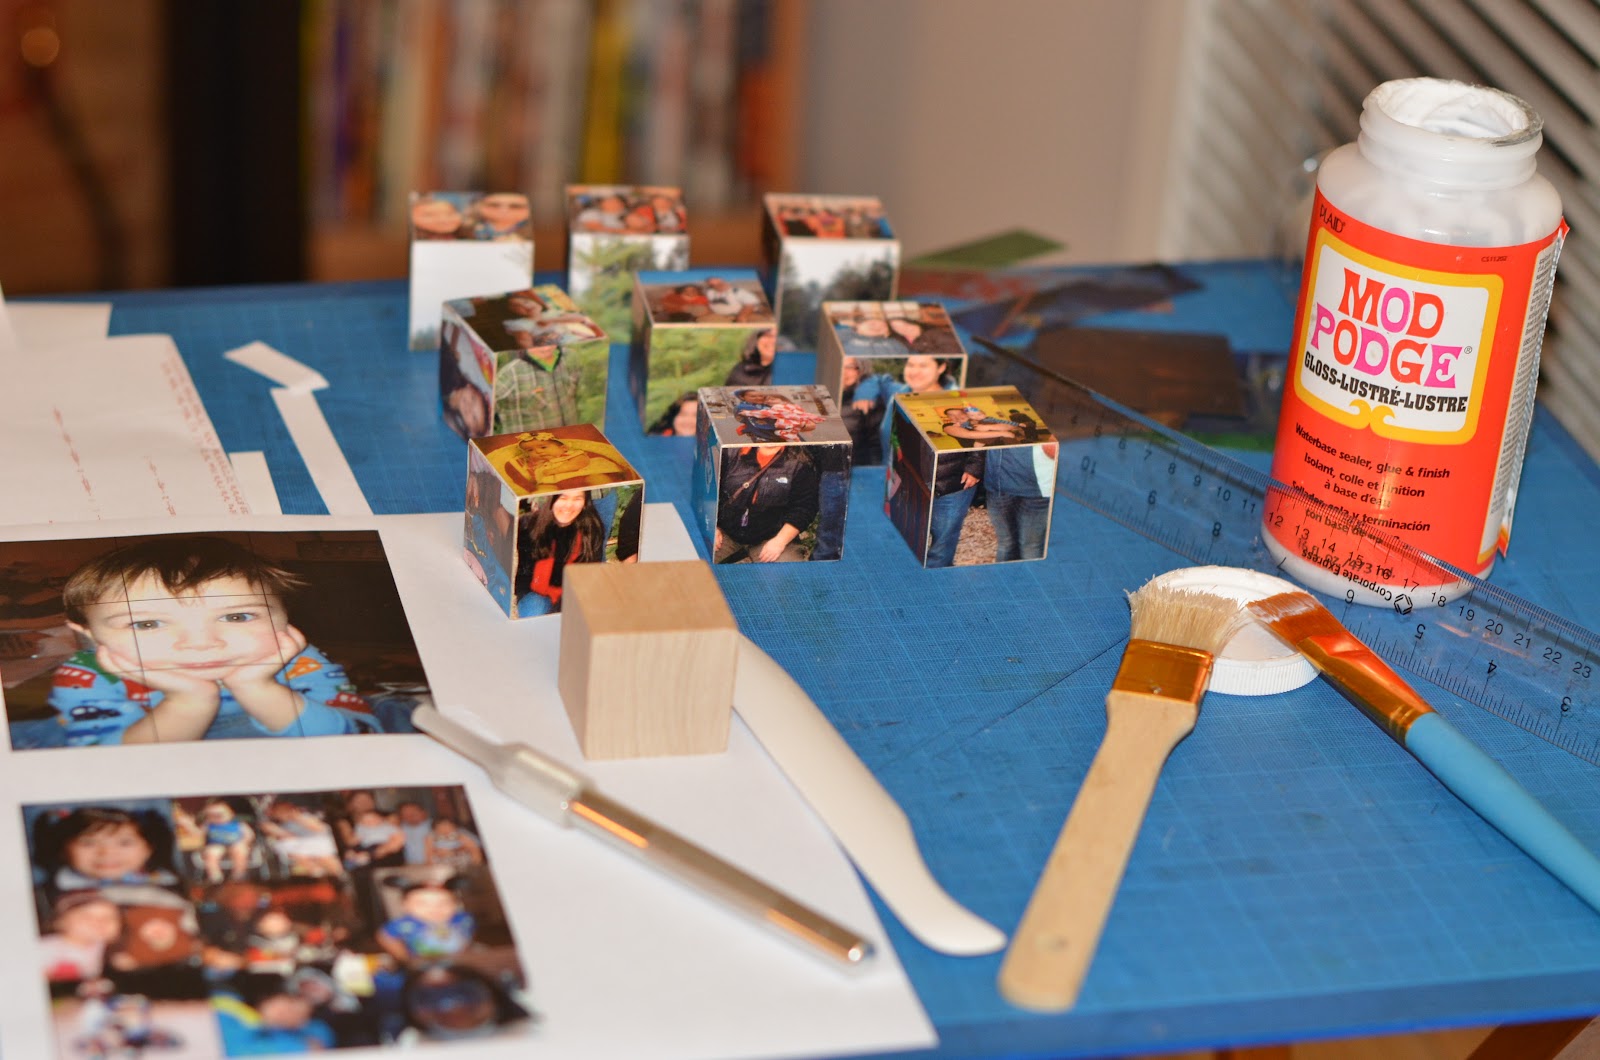
Mod Podge - or other glue that drie clear.
Exacto Knife
Bone Folder - for smoothing out the photos on the blocks and making sure the edges stayed down.
Ruler
Paint Brushes - I usually like to use foam brushes to apply glue, but I couldn't find my supply so I used a combination for fine bristle and coarse bristle brushes. I found that I liked the texture of the coarse bristles for the top coat, but I the fine bristles were nicer to adhere the photos to the blocks.
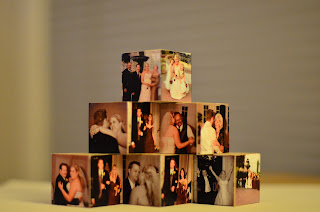
Photos - Since these will be Christmas gifts for family, these are themed sets personalized to the recipient. The pyramid of cubes is the set for my sister-in-law. The wedding was a couple of years ago so I can still use pictures from the wedding for personalized gifts.
Steps:
1. Choosing Your Pictures:
This is the most time consuming part of the project for me. The minimum number of photos you will need is 6 (one large photo per side) and the maximum needed for a set of 9 cubes is 54 for all single photos. I like puzzles so I decided to do three large pictures (4.5 inches squared) that use each of the 9 cubes to make up the picture. On the other three sides, I would do random small pictures (1.5 inches squared). So I needed 30 photos total.
 |
| The top photo is one of the large photos. As you can see the one photo is cut into 9 pieces, one for each cube. The bottom photos are 9 single photos. |
It's helpful if you create a template. Since my photo block were 3 cubes by 3 cubes, which are 1.5 inches cubed, my template was a 4.5 inch square grid, made up of 9 - 1.5 inch squares. I made the lines as skinny as possible and a dark grey and kept it in the forefront. This will help when you cut the pictures - you can still see the lines, but they don't stand out so much when you glue the pictures to the blocks. When I edited the pictures for the large pictures, I tried to avoid having eyes fall on the lines, ie become bisected by two blocks.
3. Printing and cutting:
I printed on both glossy (brochure paper) and regular copy paper. I didn't want to use photo paper because I didn't want to use thick paper. I used the ruler to line up agains the grey lines of the template and used an exacto knife to cute the pictures out into 1.5 inch squares.
4. Glueing the Pictures to the block:
At first I used only the coarse bristed paint brush (about 2 inches wide), but its a cheap brush and small pieces of the bristles would sometimes stick to the cube and I'd have to take it off so it would create bumps on my pictures. So I started using the fine bristled brush to coat the one side of the block with Mod Podge. I'd then place my 1.5 inch square photo on the cub, use the bone folder to smooth out the picture and apply pressure to the edges to make sure there were no dog ears. Also, if you picture is just a little to big on any side, you can use the bone folder to fold the extra paper over to the next side.
5. Top Coat:
I used the coarse bristle brush to pain on a top coat of Mod Podge. When I switched to the fine bristle brush for the base coat, I found that the fine bristles did not leave as musch texture on the top coat, so I switched back to the coarse bristle brush for the top coat. I like I can feel the brush strokes on pictures, but if you want a smoother look, go with the fine bristles for the top coat.
6. Let Dry and Viola! Photo cube. Repeat 6 times per cube and you're done.

I would do two - three sides of a set each night because I liked to let the sides dry a little before going on to the next side. You could do 5 of 6 sides one night and then the last side the next night or a few hours later. Also, I am thinking of lightly sanding the sides and apply a second coat of Mod Podge, but for now these are good enough. If I have time and think they need them, I'll apply a second coat closer to the holidays.
Later this week, maybe even tomorrow, I'll have worked out all the kinks to my candle holders and can post my tute for those.
Until then, Happy Crafting!
Check out these link parties for more inspiration:
Clare's Room's Under the Christmas Tree
Kootoyoo's My Creative Space
And

Sunday, September 9, 2012
It's That Time of Year Again
After several months of minimal crafting activity, the workshop is buzzing with activity again as the holidays approach. This year will feature less yarn work, which, while enjoyable, could be time consuming to finish one item. This year is a mod podge and kids theme with some projects for me and some projects for us.
The project list:
1. Photo Cubes

Pick Your Plum had a deal on sets of 9 - 1.5 inch wood cubes. I've been wanting to make photo cubes for a few years now, but every year that project doesn't make it to fruition, so I couldn't pass up these sets. I've completed two sets and third set is under way. There are 6 sides to each cube and for these three sets I decided that for three of the sides, the 9 blocks would create one picture and the for them remaining three sides, I would put single pictures (as pictured in the top photo).
2. Candle Holders


The glasses that I got aren't cylindrical and the mod podge didn't dry as clear as I would have liked, so I have some tweaks to make, but overall I am happy with finished product and am learning a lot in the process.
3. Washi tape binder clips
For work gifts, I wanted to find a project that was simple and cheap. I haven't played around with washi tape yet and I thought it would be nice to decorate the boring black binder clips with washi or decorative tape and if I run out of the tape, I can use paper. I've done a couple of test runs and plan on sealing them with Mod Podge.
4. Paper covered pencils, pens, and erasers
For Nana Bear's classmates, I thought of covering pencils with decorative paper, possibly washi paper. On the drawing board, it's a simple project, but of course, when done in bulk, who's to say how simple it will be.
5. Mini Canvases
Discount School Supply sells Mini Canvases with Easels, 6 for ~$15.00 Nana Bear loves to paint, so I thought this would be a great project for her. Dare Bear hates to be left out, so I'm sure he'll do his share of painting as well. These will be great for the grandparents and the great-grandparents.
6. Melted Beads
I saw this on One Pretty Thing a couple of weeks ago. The Artful Parent was melting pony beads and making mobiles and sun catchers with them. The kids loved helping me make the sand art candles, so I thought this would be a great project to do with them. Instead of mobiles or sun catchers, these will be ornaments and I can use the cookie cutters I bought to make the x-mas candles from the last year or two (each year's projects seem to be blurring together). I do have some concerns about the fumes from the melting plastic, so these is a maybe project. A strong maybe. I like the possibility of doing it outside on the grill, but we'll see.
My Pinterest Project board has many other projects I'd like to try, but this crafter has only so many crafting hours before Christmas, so we'll see if these list grows and contracts. I really hope to finish all the projects on this year's list as most years I get overly excited and over estimate my ability (and under estimate the time needed to finish each project). I am hoping by starting a little earlier I will get through each project. Crossing my fingers I stay sane this year.
Happy crafting!
Linked to:
Clare's Room's Under the Christmas Tree
The project list:
1. Photo Cubes
Pick Your Plum had a deal on sets of 9 - 1.5 inch wood cubes. I've been wanting to make photo cubes for a few years now, but every year that project doesn't make it to fruition, so I couldn't pass up these sets. I've completed two sets and third set is under way. There are 6 sides to each cube and for these three sets I decided that for three of the sides, the 9 blocks would create one picture and the for them remaining three sides, I would put single pictures (as pictured in the top photo).
2. Candle Holders
I saw this picture on Instructables. Iamkeebler had printed photos on transparent labels and wrapped it around a square votive. So this inspired me to print color photos on transparency paper and mod podge it to cylindrical votives.

3. Washi tape binder clips
For work gifts, I wanted to find a project that was simple and cheap. I haven't played around with washi tape yet and I thought it would be nice to decorate the boring black binder clips with washi or decorative tape and if I run out of the tape, I can use paper. I've done a couple of test runs and plan on sealing them with Mod Podge.
4. Paper covered pencils, pens, and erasers
For Nana Bear's classmates, I thought of covering pencils with decorative paper, possibly washi paper. On the drawing board, it's a simple project, but of course, when done in bulk, who's to say how simple it will be.
5. Mini Canvases
Discount School Supply sells Mini Canvases with Easels, 6 for ~$15.00 Nana Bear loves to paint, so I thought this would be a great project for her. Dare Bear hates to be left out, so I'm sure he'll do his share of painting as well. These will be great for the grandparents and the great-grandparents.
6. Melted Beads
I saw this on One Pretty Thing a couple of weeks ago. The Artful Parent was melting pony beads and making mobiles and sun catchers with them. The kids loved helping me make the sand art candles, so I thought this would be a great project to do with them. Instead of mobiles or sun catchers, these will be ornaments and I can use the cookie cutters I bought to make the x-mas candles from the last year or two (each year's projects seem to be blurring together). I do have some concerns about the fumes from the melting plastic, so these is a maybe project. A strong maybe. I like the possibility of doing it outside on the grill, but we'll see.
My Pinterest Project board has many other projects I'd like to try, but this crafter has only so many crafting hours before Christmas, so we'll see if these list grows and contracts. I really hope to finish all the projects on this year's list as most years I get overly excited and over estimate my ability (and under estimate the time needed to finish each project). I am hoping by starting a little earlier I will get through each project. Crossing my fingers I stay sane this year.
Happy crafting!
Linked to:
Clare's Room's Under the Christmas Tree
And
Subscribe to:
Posts (Atom)